

Runner. Programming languages geek. App technologies evangelist at Apple.
Generic State Machine in Swift
For the Omni Swift Bike Shed, Jake (@JakeCarter) had us experiment with view controllers and state machines. I wanted to share my solution, because I think it provides a good example of protocols, generics, and pattern matching in Swift. The complete code is available on github.
First some context. Here’s an excerpt of Jake’s problem description.
Most of the code that goes into view controllers is there to maintain state, yet we rarely setup a formal state machine for it. I’d like to have us explore that for a week.
We’re basically going to build the client-side view controller that handles displaying and downloading a stencil from Stenciltown.1 …
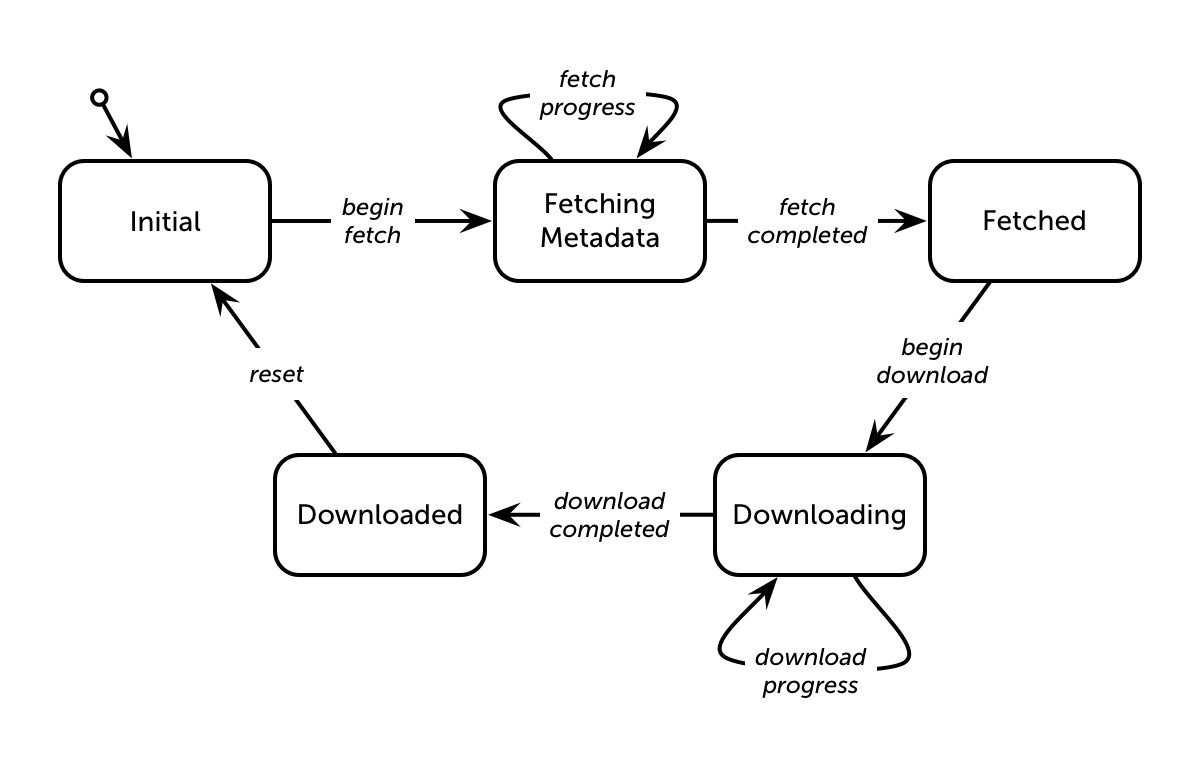
Your view controller should be able to handle the following scenarios.
- After presentation, you will need to asynchronously ‘download’ item metadata. This will be an image thumbnail and textual description.
- After the metadata is ‘fetched’, you should be able to display it.
- Somewhere in the view should be a ‘Download’ button used to ‘download’ the actual file. When this is tapped you should display a progress bar as the file ‘downloads’.
- After the file ‘downloads’ the view should reflect the fact that it’s done. Perhaps by disabling the ‘Download’ button.
Here’s a state diagram that reflects the states and events from Jake’s description:
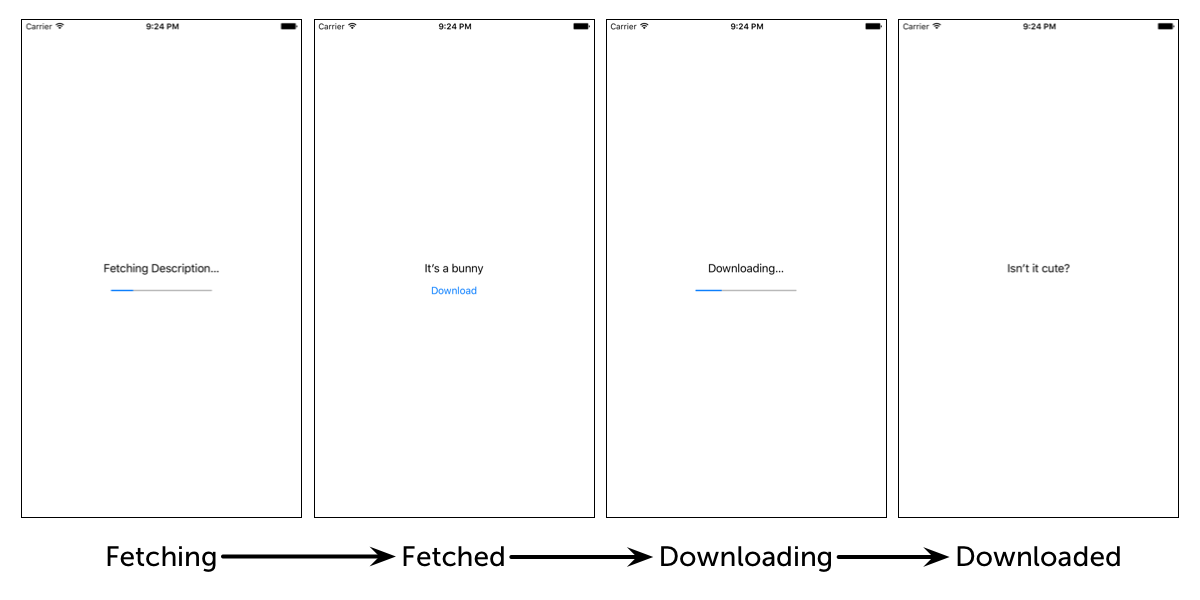
And here’s how we want the sample app to appear in each of the visible states:
My first goal was to implement a generic state machine that would be reusable for different sets of states and transitions. My second goal was to use a view model approach, where we could push updated view state to a view controller that wouldn’t have any responsibilities apart from managing its views.
Let’s start by looking at the overall architecture of the solution before diving into the individual types:
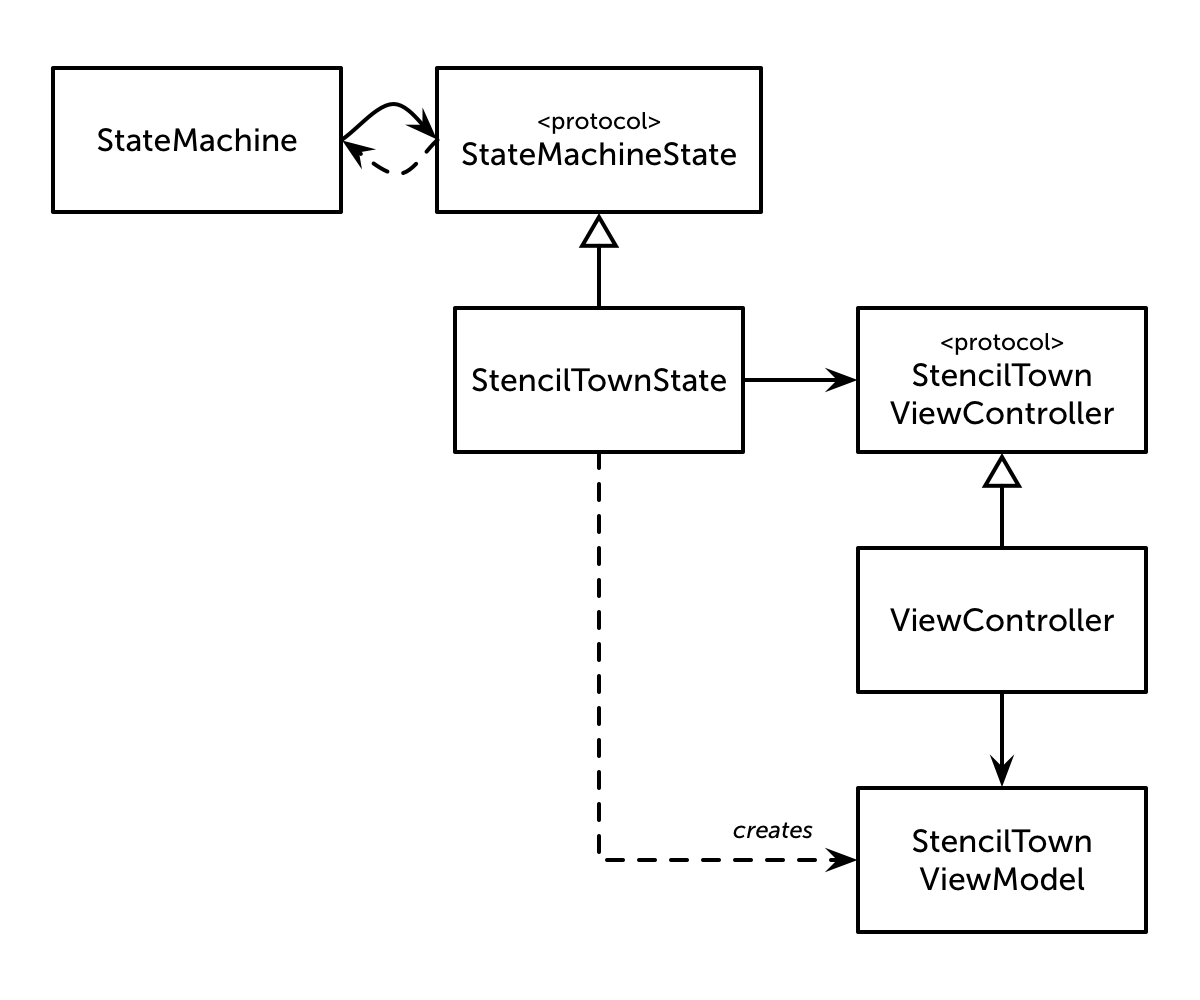
The generic StateMachine has a reference to its current StateMachineState. While processing actions in response to events, the StateMachineState instance gets a reference to the state machine. It can use this to trigger subsequent events. We’ll look at an example of that below.
StateMachineState is a protocol. This lets us use a StateMachine instance to drive any state machine, not just the one Jake described for us. StenciltownState is a concrete implementation of the protocol for this problem.
StenciltownState has a reference to the view controller. This reference is also a protocol type, StenciltownViewController. Using a protocol here means that we could drive different view controllers with StenciltownState. The implementation for Jake’s problem just drives a single, full-screen view, but we can imagine other scenarios. For example, we might want to include a download status bar embedded in another view so that a person could continue working while the download proceeds.
StenciltownState creates updated view model instances as needed and passes them to the view controller. Whenever this happens, the view controller just updates its views.
In a real app we’d set up all this structure alongside the segue to the view controller. For the sample app we just do it in our app delegate:
    func application(application: UIApplication, didFinishLaunchingWithOptions launchOptions: [NSObject: AnyObject]?) -> Bool {
        if let rvc = window?.rootViewController as? ViewController {
            let stencilTownState = StenciltownState(viewController: rvc)
            stateMachine = StateMachine(state: stencilTownState)
        }
        return true
    }
With the basic architecture in place, let’s look at the implementation of the individual pieces.
StateMachine Class
We model the state machine using a class. I prefer to use value types where possible, but a state machine exists to model state. We need mutable references to the state machine from multiple places.
class StateMachine {
We want the state machine to be reusable with different configurations, so it has a generic parameter State. State has to conform to the StateMachineState protocol. We can figure out the requirements of the protocol as we go.
The state machine has just a single property, a stored reference to the state:
var state: State
The state machine’s initializer just stores the state and tells it that it’s entered its initial state:
    init(state: State) {
        self.state = state
        self.state.resetToInitialStateWithStateMachine(self)
    }
So the first method our StateMachineState protocol needs is resetToInitialStateWithStateMachine(_:).
Once the state machine is initialized it responds to events, updating the state and taking any necessary actions. That work is handle by the processEvent(_:) method:
func processEvent(event: State.EventType) {
Notice the type of event. EventType is a nested type of State. This ensures that StateMachine is only asked to process events that are appropriate for its State and means that our StateMachineState protocol needs an associated type for events.
For each event, the state is given a chance to take any pre-transition actions:
state.takePreTransitionActionForEvent(event, withStateMachine: self)
So our StateMachineState protocol also needs takePreTransitionActionForEvent(_:, withStateMachine:). Next the event is passed to the state, giving it the opportunity to transition to a new state.
let outcome = state.transitionWithEvent(event)
Depending on the outcome of the transition, we may need to give the state a chance to execute actions for leaving the old state and entering the new one:
        switch outcome {
        case .NewState(var previousState):
            previousState.takeExitStateActionWithStateMachine(self)
            state.takeEnterStateActionWithStateMachine(self)
        case .SameState:
            break
        }
From this, our StateMachineState protocol needs methods for transitioning between states and taking actions when exiting and entering them.
Finally, we give the state a chance to take any post-transition actions:
        state.takePostTransitionActionForEvent(event, withStateMachine: self)
    }
}
That wraps up the StateMachine class in just 19 lines of code.
StateMachineState Protocol
Let’s define the StateMachineState protocol next. It begins like this:
protocol StateMachineState {
    typealias EventType
EventType is an associated type inside the protocol. In my initial attempts I tried to model both the states and the events with top-level protocols. However, it’s not (currently?) possible to define mutually recursive protocols in Swift. Practically, the states of a state machine and the events that cause the machine to transition are often tightly coupled—they certainly are in Jake’s problem. Nesting the event type inside the StateMachineState protocol solves the mutual recursion between states and events.
The rest of the protocol is based on the methods we listed while implementing StateMachine. First, we have a method to reset to the initial state:
mutating func resetToInitialStateWithStateMachine(stateMachine: StateMachine)
The use of Self here is interesting. Recall this bit of our architecture from above:

The Self type in StateMachine lets us express this mutual dependency. As a concrete implementation of StateMachineState, StenciltownState knows that the state of the machine passed to it will be a StenciltownState. And because of the EventType associated type, StenciltownState knows that it can pass its own events to that state machine.
Next we have the transition function:
mutating func transitionWithEvent(event: EventType) -> TransitionOutcome
The use of Self in the TransitionOutcome is how StateMachine knows that the previous state embedded in the .NewState(previousState) is of the same type as its own state.
The StateMachineState protocol wraps up with the four action methods:
    mutating func takePreTransitionActionForEvent(event: EventType, withStateMachine stateMachine: StateMachine)
    mutating func takeEnterStateActionWithStateMachine(stateMachine: StateMachine)
    mutating func takeExitStateActionWithStateMachine(stateMachine: StateMachine)
    mutating func takePostTransitionActionForEvent(event: EventType, withStateMachine stateMachine: StateMachine)
}
It may seem a bit odd that the four action methods are mutating. This is necessary so that our StenciltownState implementation of StateMachineState can update its view controller in response to the action callbacks.
ViewController
Before looking at how StenciltownState implements the protocol, let’s take a quick look at the view model and the ViewController class.
StenciltownState sends view model instances to the view controller whenever the state machine updates. We use a simple, immutable struct for the view model. All the properties are let-defined or computed:
struct StenciltownViewModel {
    let stateDescription: String
    let downloadButtonHidden: Bool
    let progressBarHidden: Bool
    let progressBarProgress: Float
    private let fetchOperation: (() -> Void)?
    private let downloadPressOperation: (() -> Void)?
    var downloadButtonEnabled: Bool {
        return downloadPressOperation != nil
    }
The initializer defines default values for all the properties apart from the state description:
    init(description: String, downloadButtonHidden: Bool = true, progressBarHidden: Bool = true, progressBarProgress: Float = 0.0, fetchOperation: (() -> Void)? = nil, downloadPressOperation: (() -> Void)? = nil) {
        self.stateDescription = description
        self.downloadButtonHidden = downloadButtonHidden
        self.progressBarHidden = progressBarHidden
        self.progressBarProgress = progressBarProgress
        self.fetchOperation = fetchOperation
        self.downloadPressOperation = downloadPressOperation
    }
Note how the fetchOperation and downloadPressOperation are closures. The view model exposes two methods to the view controller, both of which just defer their implementations to the closures:
    func download() {
        downloadPressOperation?()
    }

    func beginFetch() {
        fetchOperation?()
    }
}
By passing the implementations of these methods into the view model as closures, we confine all the business logic for the system in StenciltownState. And by making these closures optional and using optional chaining—the ? in fetchOperation?()—we make the methods do nothing in states where there is nothing to do.
The StenciltownViewController protocol is as simple as can be:
protocol StenciltownViewController {
    var viewModel: StenciltownViewModel? { get set }
}
Our ViewController implements the protocol and updates its views in response to changes. Here’s the protocol implementation:
class ViewController: UIViewController, StenciltownViewController {
    @IBOutlet weak var statusLabel: UILabel!
    @IBOutlet weak var downloadButton: UIButton!
    @IBOutlet weak var progressView: UIProgressView!

    var viewModel: StenciltownViewModel? {
        didSet {
            updateView()
        }
    }
I really like the use of didSet here. StenciltownState has minimal knowledge of the view controller, but we can easily update our views when the view model changes. (I’m looking forward to trying a reactive programming approach to solving this same problem to see how it compares.)
The updateView method does what it says on the tin:
    func updateView() {
        guard viewIfLoaded != nil else {
            return
        }
        guard let viewModel = self.viewModel else {
            return
        }

        if statusLabel.text != viewModel.stateDescription {
            statusLabel.text = viewModel.stateDescription
        }
        downloadButton.hidden = viewModel.downloadButtonHidden
        downloadButton.enabled = viewModel.downloadButtonEnabled
        progressView.hidden = viewModel.progressBarHidden
        progressView.progress = viewModel.progressBarProgress
    }
We round out ViewController by using the two methods provided by the view model. For this example, the beginFetch() method is called when the view appears:
    override func viewWillAppear(animated: Bool) {
        super.viewWillAppear(animated)
        updateView() // in case view wasn't loaded when viewModel was set
        viewModel?.beginFetch()
    }
And the Download button’s action just calls download() on the view model:
    @IBAction func download(sender: AnyObject) {
        viewModel?.download()
    }
}
With the infrastructure and user interface in place, we can turn our attention to the business logic, which is embedded in StenciltownState.
StenciltownState
The final piece of our solution is a concrete implementation of our StateMachineState protocol:
struct StenciltownState: StateMachineState {
The StateMachine class holds the only reference to the StenciltownState. We don’t have to use the state value to communicate changes to any other objects, so StenciltownState can be implemented as a struct.
StenciltownState defines two nested enums, one for the current state and one for the supported events:
    enum State {
        case Initial
        case Fetching(progress: Float)
        case Fetched
        case Downloading(progress: Float)
        case Downloaded
    }

    enum Event {
        case BeginFetch
        case FetchProgress(progress: Float)
        case FetchCompleted
        case BeginDownload
        case DownloadProgress(progress: Float)
        case DownloadCompleted
        case Reset
    }
It’s a bit unusual to nest these enums, but I like what it does for naming. The states and events are inextricable from StenciltownState. From outside the struct, we can refer to the nested types like StenciltownState.Event.
Alternatively, we might have tried to move the enums to the top-level and make them private. Swift’s type system thwarts us there, at least for events.
StateMachineState specifies an associated type, EventType, and uses it as an argument to most of its methods. StenciltownState.Event is how we implement that associated type. If we try to make Event private, the compiler tells us that our implementations of those protocol methods must also be private. But if we make the implementations private, then we’re told that we have to make them internal to conform to the protocol! Because all of the business logic is defined by StenciltownState, we never actually reference the concrete Events outside it. It seems like Event could be private, but the static analysis to discover that might not be practical. So, until the Swift compiler team has time to improve privileged access support, our event type will have to be internal.
It’s also a bit unusual to have a State enum inside a StenciltownState type. I initially tried making StenciltownState an enum itself, but there’s no mechanism for storing additional information on an enum apart from associated values. We need to maintain a reference to our view controller. It would be awkward to make every case of a top-level state enum carry a view controller which we pass around on each transition. So, though it’s a bit strange to track a state value inside the StenciltownState type, it meets our need:
    private var viewController: StenciltownViewController
    private var state: State

    init(viewController: StenciltownViewController) {
        self.viewController = viewController
        self.state = State.Initial
    }
The implementations of the various StateMachineState protocol methods are straightforward. This is the beauty of designing with state machines. They encourage a systematic breakdown of a problem into states and transitions. Even if the combined system is complicated, the handling of each state is usually simple.
To initialize the state, we just set our initial state and pass an updated view model to the view controller:
    mutating func resetToInitialStateWithStateMachine(stateMachine: StateMachine) {
        self.state = State.Initial
        viewController.viewModel = viewModelWithStateMachine(stateMachine)
    }
The transitionWithEvent(_:) method defines how the state machine moves between states. Swift’s ability to pattern match on tuples really shines here:
    mutating func transitionWithEvent(event: Event) -> TransitionOutcome {
        let previousState = self
        switch (state, event) {
        case (.Initial, .BeginFetch):
            state = .Fetching(progress: 0.0)
        case (.Fetching, .FetchProgress(let progress)):
            state = .Fetching(progress: progress)
            return .SameState
        case (.Fetching, .FetchCompleted):
            state = .Fetched
        case (.Fetched, .BeginDownload):
            state = .Downloading(progress: 0.0)
        case (.Downloading, .DownloadProgress(let progress)):
            state = .Downloading(progress: progress)
            return .SameState
        case (.Downloading, .DownloadCompleted):
            state = .Downloaded
        case (_, .Reset):
            state = .Initial
        default:
            // could conceivably transition to error state if we got an unexpected event, but for now just ignore it
            return .SameState
        }
        return .NewState(previousState: previousState)
    }
The transition method is just responsible for updating the state according to our original state transition diagram. All the actions that happen around events and transitions are handled by the other protocol methods. For example, if we’re in the .Initial state and receive the .BeginFetch event, we just transition to the .Fetching state with no progress recorded. The transition method doesn’t have to do the work of beginning the actual fetch.
Beginning the fetch is handled by the next method in the protocol. Before transitioning, we have an opportunity to take an action based on the event. StenciltownState uses that to simulate an asynchronous metadata fetch and asynchronous download:
    func takePreTransitionActionForEvent(event: Event, withStateMachine stateMachine: StateMachine) {
        switch event {
        case .BeginFetch:
            simulateAsyncOperationLastingSeconds(5, forStateMachine: stateMachine, completionEventGenerator: { .FetchCompleted }, progressEventGenerator: { .FetchProgress(progress: $0) })
        case .BeginDownload:
            simulateAsyncOperationLastingSeconds(10, forStateMachine: stateMachine, completionEventGenerator: { .DownloadCompleted }, progressEventGenerator: { .DownloadProgress(progress: $0) })
        case .Reset:
            // Exercise for the reader: Currently there's no way to trigger a reset in the UI. How would you add it?
            break
        default:
            // Let state transitions handle
            break
        }
    }
In practice, rather than simulate the download, we’d use an NSURLSession to initiate a download and implement NSURLSessionDownloadDelegate to track progress.
After each transition, we generate a new view model and pass it to the view controller:
    mutating func takePostTransitionActionForEvent(event: Event, withStateMachine stateMachine: StateMachine) {
        viewController.viewModel = viewModelWithStateMachine(stateMachine)
    }
}
All that remains is to implement the helper method that generates the view models. The helper method switches on the current state and takes advantage of the default arguments in StenciltownViewModel’s initializer.
    private func viewModelWithStateMachine(stateMachine: StateMachine) -> StenciltownViewModel {
        switch state {
        case .Initial:
            return StenciltownViewModel(description: "", fetchOperation: { stateMachine.processEvent(.BeginFetch) } )
In the initial state, we define a fetch operation that passes the .BeginFetch event to the state machine. Recall that ViewController’s viewWillAppear() tells the view model to beginFetch(). The view model will invoke the fetch operation defined above, sending the event to the state machine and kicking off a fetch of the metadata.
As the metadata is fetched, we move into the .Fetching state and generate view model instances with the updated progress:
        case .Fetching(let progress):
            return StenciltownViewModel(description: "Fetching Description…", progressBarHidden: false, progressBarProgress: progress)
Once the metadata is fetched, we simulate the metadata—“It’s a bunny”—and enable the download button:
        case .Fetched:
            return StenciltownViewModel(description: "It’s a bunny", downloadButtonHidden: false, downloadPressOperation: { stateMachine.processEvent(.BeginDownload) })
In practice, we’d process the fetched metadata and include that information in the view model at this point.
We generate similar view model instances when downloading:
        case .Downloading(let progress):
            return StenciltownViewModel(description: "Downloading…", progressBarHidden: false, progressBarProgress: progress)
        case .Downloaded:
            return StenciltownViewModel(description: "Isn’t it cute?")
        }
    }
}
Again, we’d include the actual downloaded information in the view model in a real app.
Conclusion
For me, several interesting insights fell out of this problem.
- Separating concerns using the protocols—
StateMachineStateandStenciltownViewController—is a huge win. They let us makeStateMachineandStenciltownStategeneric and reusable. - Associated types in protocols—
EventTypeinStateMachineState—solve the problem of mutually recursive generic types. With this approach, states and events always go together. - The
Selftype as a generic parameter provides another way to express mutual dependency. Implementations ofStateMachineStateknow that the state of the machine passed to them will be of their own type. - Pattern matching on tuples is an excellent way to implement the transition function for a state machine. The code is readable and the type checker ensures that we’ve covered every combination of state and event.
- Embedding all the business logic in a single struct,
StenciltownState, and using a view model to update the view controller leads to greater clarity about where to write (and find) code.StateMachineandViewControllerare very simple.StenciltownStateis more complex, but theStateMachineStateprotocol prescribes a structure on the code that makes it easy to navigate.
I really enjoyed Jake’s state machine problem. It’s easy to describe but has surprising depth. Maybe you’ll be inspired to write your own solution. If so, I’d love to see it! Let me know: @curtclifton.
---1. This post does not describe the actual implementation of Stenciltown support in OmniGraffle. Stenciltown just serves as a nice example use case.
Runner. Programming languages geek. App technologies evangelist at Apple.
Copyright © 2010–2024, Curtis Clifton
Built with BlogGen 2.1